Friday, August 31, 2012

Summer Fruit Galette

Summertime should be easy and so should summer desserts. Galettes are the best thing. Use the fruit you have and adjust the sugar as necessary. Berries will be release more juice, so make sure you fold those edges up nicely and use parchment paper for easy clean up. Below are the fruits I used, but feel free to change it up to anything you like.

Summer Fruit Galette:

Makes 2 8” galettes

1 full recipe galette dough
1 peach, peeled and sliced
2 small plums, sliced
2 apricots, sliced
2 Tb. lemon juice
¼ c. sugar
Citrus sugar for sprinkling

Prep the galette dough, let rest for at least an hour in the fridge, and bring back to room temperature while you prepare the fruit.
Mix the fruit in a medium size bowl. Toss with lemon juice and sugar and let sit at room temperature for about 30 minutes. Meanwhile, heat your oven to 400 degree and roll out your dough. It’s sticky, so you’ll need to add flour to your work surface and rolling pin. Work into about 10” circles and transfer to a parchment paper lined baking sheet.
Take macerated fruit and pile in the middle of each galette circle. Fold over edges to make a crust. Freeform it – galettes are not the time to be super fancy. Sprinkle edges with citrus sugar.
Bake for 30 minutes or until fruit is bubbling and you have a nicely browned crust. Let cool for at least 10 minutes before cutting into it.

Though I do say this is a summer dessert, I won’t tell anyone if you have some for breakfast. Promise.

Wednesday, August 29, 2012

Cherry Pie

Rainier cherries are one of my favorite summer fruits. I really wanted to turn them into a pie, but most recipes require sour cherries. That’s fine for some, but I wanted to use these bad boys, so I scoured my cookbooks and not surprisingly, I found a lot of cherry pie recipes. Thomas Keller’s Ad Hoc at Home (seen previously here and here) was the winner in using sweet cherries. He recommends Bings. I say Rainiers if you can get them. They rock just that much more.

As a side note, I’d like to mention that this is the best my pie crust, excluding the very different galette dough which I have used as pie dough here and here, has ever tasted. My friend Corey mentioned the crust to me specifically after I gave her a big piece for her and her husband to share. I am a big, big fan of this pie and you should be too.

Cherry Pie from Ad Hoc at Home:

Makes 1 double crusted pie

Crust-
2½ c. all-purpose flour plus more for rolling
1¼ tsp. salt
2½ sticks (10 oz.) unsalted butter, cut into ½” pieces and chilled
About 5 Tb. ice water

Filling-
2 Tb. cornstarch
2 Tb. water
7 c. sweet cherries, pitted
¾-1 c. granulated sugar
1 Tb. vanilla extract

1 large egg, beaten
Granulated sugar for sprinkling

Keller may prefer to make his pie doughs by hand, but I’m still a big fan of the food processor method. The instructions reflect my bias. It’s great to get your dough done ahead of time so you only have to worry about the filling/rolling out the dough, depending on if you have help/how fast you can pit cherries.

Combine the flour and salt in the work bowl of a food processor. Add in the butter and pulse a few times until the butter pieces are well incorporated and no larger than a pea. Drizzle ¼ cup of water over the top and pulse a few times until the dough just holds together when pinched.  Add the remaining tablespoon of water if the dough is very dry. Turn out of the food processor and don’t worry if it looks like a big pile of flour. Knead the dough until it is completely smooth and the butter is incorporated. This last part has always been what I have struggled with, but this time I just kneaded it more and didn’t try to add any additional water, which can make the dough tough instead of flaky and delicious.

Divide the dough in about half, with one piece slightly larger than the other. The larger piece will be for the bottom crust. Shape each half into a 1” thick disk, wrap tightly in plastic wrap, and refrigerate for at least 1 hour. As my mom always says, you have to give the gluten time to rest.

Combine the cornstarch and the water in a small bowl, stirring to dissolve the cornstarch into a slurry.

Put 5 cups of cherries in a large bowl and set aside. Put the remaining 2 cups of cherries I a food processor and blend into a puree. Don’t worry if there are some small pieces remaining. Taste the puree to check how sweet it is.

Combine the puree and sugar (¾ cup if the cherries are very sweet, up to 1 cup if they are more tart) in a medium saucepan, bring to a simmer over medium heat, and simmer for about 30 minutes, stirring often to prevent the bottom from burning, until the mixture has reduced to 1¼ to 1½ cups. Reduce the heat to medium-low and, stirring constantly, add the cornstarch slurry.

Bring to a boil, stirring, and cook until the mixture becomes translucent again. Remove from the heat, spoon a little of the puree mixture onto a plate, and let cool slightly, then rub it between your fingertips to feel for any remaining grains of cornstarch. If necessary, cook slightly longer to dissolve the cornstarch. Transfer the filling to a medium bowl and stir in the vanilla extract. Let cool completely.      

If the dough is too hard to roll, let it rest at room temperature for a few minutes or pound it a few times with a rolling pin. Or, in my case, do both. Lightly flour the work surface and the rolling pin. Lightly dust the top of the larger disk of dough with flour and roll it out to a 13-14” round, about 1/8” thick. Roll outward from center, rotating the dough frequently and adding a little flour to the work surface or dough as needed to prevent sticking. Fold the dough in half and transfer to a 9-10” pie plate, gently easing the dough into the corners and up the sides. Roll out the second piece of dough in the same manner, to a 12” round, about 1/8” thick. Place on a parchment lined baking sheet. Refrigerate both doughs for 15 minutes. Again, resting is important.

Position one oven rack in the bottom of the oven and the other in the center and preheat to 400 degrees.

Stir the puree into the whole cherries and pour into the pie shell. At this point, if the top crust is too hard to shape, let it rest at room temperature for a few minutes. Moisten the rim of the pie shell with some of the beaten egg. Cover the filling with the top crust and press the edges together to seal and create a raised edge to the crust. Trim away the excess dough that overhangs the rim. Brush the top crust with the beaten egg and sprinkle with sugar. Using  paring knife, cut a few slits in the top of the pie for steam vents. Put on the bottom rack and bake for 20 minutes.

Lower the heat to 375 degree, move the pie to the center rack, and bake until the crust is golden and the filling is bubbling, 20 to 30 minutes. Transfer the pie to a cooling rack to cool.
According to Keller, the pie is best served 2 to 3 hours after it is baked, but it can be kept at room temperature the day it is baked or wrapped and refrigerated for up to 3 days. To heat, warm in a 325 degree oven for about 15 minutes.
I started eating this about 20 minutes after it came out of the oven. It is a fantastic summer dessert, great with or without vanilla ice cream.


Tuesday, August 28, 2012

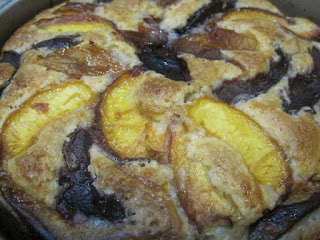
Nectarine Plum Cake


I love summer desserts. Fruit in summer is the best thing. Okay, fruit any season is the best thing, but it’s summer now, so let’s focus on that. This week I’m going to post a few summer dessert recipes because a) summer b) I like baking and c) yeah, okay, I promise to blog about something with garlic again soon, even though 4 of my last 7 post have included garlic. Anyway…

Sometimes I get crazy ideas into my head. Like – I really want cake and even though it’s 9 pm, I’m going to bake one. Fortunately this cake is a snap and you won’t be up forever waiting for cake. My grandma used to make me a peach cake every summer when she came to visit my family in Alaska. I didn’t have any peaches, but figured any stone fruit would work. This recipe looked similar to the one she used to make. I had to make some other substitutions because it was 9 pm – like no whole milk (I never have that in the house), different yogurt, and no zest, but including citrus sugar.  Citrus sugar is simply a jar of sugar I have that’s mixed in with the zest of oranges and lemons I have saved. Easy and a fun thing to have on hand. I think my version of this cake was pretty darn good too. Make it any ol’ time. Even late at night.

Nectarine Plum Cake modified from Peach Cake from Cooking From Scratch:

Makes one 9” cake

1½ c. flour
1 c. sugar
1½ tsp. baking powder
A dash salt
¾ c. milk
1 tsp. vanilla
1 egg
1/3 c. honey Greek style yogurt
1/3 c. vegetable oil
2 small-ish nectarines, sliced
2 small plums, sliced
2 Tb. citrus sugar (or regular sugar and include ½ tsp. lemon zest in the cake itself)

Preheat the oven to 350 degrees F. Mix the flour, sugar, and baking powder together in a bowl. In a separate bowl, mix the milk, vanilla, egg, yogurt, oil, and lemon zest (if using) together. Add the wet ingredients to the dry and stir completely. Spray a 9" round pan with oil. Pour the batter into the pan. Place the sliced fruit on the top of the batter. You don't need to press them in; the batter will rise up around them. Sprinkle with citrus sugar. Bake at 350 for 60 minutes or until the cake is nice and golden and a tester comes out clean. Let cool slightly before serving.

It’s not a heavy cake and reminds me a lot of the very best raspberry buttermilk cake, another summer favorite. Perfect with tea or for late night cake cravings. 

Friday, August 24, 2012

(Almost) Perfect Strawberry Jam


Ever have a recipe that doesn’t seem like it’s working out and then it mostly does? This is one of those recipes. By Lucy Baker (of The Boozy Baker that has shown up here and here in the blog), it was cooking strangely and ended up ½ pint short of the yield, causing me to waste a lid. And then it was opened and super delicious and it spreads really well. Yeah. Almost perfect.

(Almost) Perfect Strawberry Jam from Perfect Strawberry Jam via Serious Eats:

Yields 4 ½ pints

1½ c. sugar
2½ tsp. Pomona's Universal Pectin
4 c. coarsely chopped strawberries (from about 2 farm stand quarts)
1 Tb. freshly squeezed lemon juice
3 tsp. calcium water (included in the Pomona's packet)
¼ tsp. unsalted butter
1 c. honey


Whisk the sugar and pectin a medium bowl and set aside.

Combine the strawberries, lemon juice, calcium water, and butter in a large, heavy-bottomed pot and bring to a boil over medium-high heat. Add the honey and the sugar-pectin mixture and return the fruit mixture to a boil, stirring constantly. Boil hard for one minute. This takes a little longer than you might think, hence by comment about cooking strangely.

Remove pot from heat and skim any foam from surface of jam with cold metal spoon. Ladle jam into hot sterilized jars and process them in a hot water bath for 10 minutes.
It’s great with peanut butter or cream cheese or just on a spoon. Other similar pectin berries can replace the strawberries if you want to check this out right now and you can’t find those late season strawberries anywhere.

Saturday, August 18, 2012

Toasted Almond Granola


Okay, so your oven is going to have to go on for a little bit for this one. But then you can eat some delicious granola on cool, cold things like yogurt or almond milk or fro-yo. Worth it. Joy the Baker always hits it out of the park and this granola recipe is no exception. Granola is rad, but can be spendy. Not when you make it yourself! Get to it!

Toasted Almond Granola from Joy the Baker:

Makes 8 cups

4 c. old fashioned oats
1 c. slivered raw almonds
1 c. whole raw almonds
½ c. sweetened shredded coconut
1 tsp.  ground cinnamon
½ tsp. salt
3 Tb. butter
¼ c. vegetable oil
¼ c. honey
½ c. brown sugar
1 tsp. pure vanilla extract

Place a rack in the upper third and middle of the oven and preheat to 325 degrees F.  Line one large or two small baking sheets with parchment paper and set aside.
Whisk together oats, whole almonds, slivered almonds, sweetened coconut cinnamon and salt.  Set aside.

In a medium saucepan, melt together butter, oil, honey and brown sugar until the sugar is dissolved and the mixture begins to boil.  Carefully whisk together so it’s well incorporated.  Add the vanilla extract.  Pour the warm mixture over the oat and almond mixture and toss together with a wooden spoon, ensuring that all of the oat mixture gets moistened by the sugar and oil mixture.
Spread mixture onto prepared baking sheet(s) and bake for about 25 to 30 minutes, removing the oats to stir and toss on the pan twice during baking.  Remove from the oven, let cool and store in an airtight container for up to two weeks.
This is tasty times morning, noon, and night. I also mixed in some raisins, dried cranberries, and M&Ms to make trail mix to take with me when I went to Juneau last month. Perfect anytime weather food, but especially good for hot mornings.

Wednesday, August 15, 2012

Caramelized Onion Hummus


My friend Patrice and her now husband make some pretty tasty things. I’ve featured her loveliness on the blog before and this is another one that I’ve had saved in my reader for forever. Other than cooking the onions, this is a low heat recipe – perfect for the hot days of summer to typical Alaskan days.

Caramelized Onion Hummus from The Fantastic Mr. Feedbag:

 1 large medium onion, chopped
3 Tbsp. olive oil
1 tsp. honey
4 to 5 garlic cloves, halved
1 can of garbanzo beans (rinsed & drained) or around 2½ c. soaked & cooked
2 Tbsp. tahini
1 lemon, juiced
¼ c. of olive oil
2¼ Tb. plain yogurt
Sea salt & pepper to taste
1 Tb. Aleppo pepper for topping

Heat the 3 tablespoons of olive oil in a skillet over medium heat. Add chopped onions and honey stir and cook for 10 minutes. Add garlic and cook for another 10 minutes, stirring often. Remove onion, garlic, honey combo and let cool.
While onion mixture is cooling use a food processor to combine the rest of the ingredients. Add more olive oil or water for a creamier texture.  Add onion, garlic, honey mixture to bean mixture and process until smooth. Let it hang in the fridge for a couple of hours to cool and get even more delicious.

This is the creamiest, best tasting hummus I’ve ever had or made. I recommend it and not just because it came from a loving household.

Tuesday, August 14, 2012

Beet Hummus


I had this whole plan to do some things to eat in hot weather, but you need to have cool weather beforehand to make it. Yes, I had a plan even though I haven't posted since June. But it's all super hot again. If you can stand to put the oven on for a bit, say early in the AM or later in the eve, you can have super tasty treats when it just gets so hot that even looking at the oven is too much.
This beet hummus was one of the very first things I starred in my reader. I'm glad I finally got to it. My version was not as vibrant as the original, but I also ended up using candy cane beets that were in my CSA. Still, this is fun, fairly easy, and perfect with cool slices of carrot and cucumber. And crackers. And pita chips.

Beet Hummus from Simply Recipes:

Makes 2 cups.

½ lb. beets (about 4 medium sized beets), scrubbed clean, cooked, peeled, and cubed
2 Tb. tahini sesame seed paste
5 Tb. lemon juice
1 small clove garlic, chopped (I did more like 3)
1 Tb. ground cumin
1 Tb. lemon zest (zest from approx. 2 lemons)
Generous pinch of sea salt or Kosher salt
Fresh ground pepper to taste

To cook the beets, cut off any tops, scrub the roots clean, put them in a covered dish with about ¼-inch of water in a 375°F oven, and cook until easily penetrated with a knife or fork.

Place all ingredients in a food processor (or blender) and pulse until smooth. Taste and adjust seasonings and ingredients as desired.
Chill and store in the refrigerator for up to 3 days or freeze for longer storage.

This tastes kind of like salsa and hummus got together and made a delicious snack baby.

Related Posts Plugin for WordPress, Blogger...