Thursday, January 29, 2009

Apple-Cinnamon Wontons

Back in the old dieting days, I printed off a bunch of Weight Watchers recipes from their website with the grand idea that I would try them all and they would be delicious and good (or better) for me. I did try a few and some were rather amazing, while others were just…very diet-y. One that I did discover and love are these apple-cinnamon wontons. They look pretty fancy and are not a lot of work, especially if you have a food processor.

I brought these over to my friend’s house and while they weren’t as popular as I had hoped, Carrina’s husband couldn’t stop eating them. So that’s a very positive review. I think they’d be a little crispier and maybe a bit better tasting if melted butter/coconut oil or the like were used instead of cooking spray. Again, this is a WW recipe and they look to cut corners wherever they can. The original recipe calls for them to be served sprinkled with powdered sugar and with ice cream. While I don’t usually do anything with powdered sugar, these really are nice with a good vanilla ice cream.

Apple-Cinnamon Wontons from weightwatchers.com:

Serves 6 or works great as part of a dessert platter

Cooking spray
2 medium apples, peeled, cored, and minced
1 Tb. packed brown sugar
1 tsp. lemon juice
½ tsp. ground cinnamon
24 wonton wrappers, about half of a 12 oz. package

Preheat oven to 350 degrees. Coat a large baking sheet with cooking spray.


In a medium bowl, combine apples, brown sugar, lemon juice, and cinnamon; toss to coat apples. Place wonton wrappers on a flat surface. Drop apple mixture by teaspoonfuls onto center of each wrapper. Moisten edges with wet fingers, fold over old corned to make a triangle, and press side together to seal. You may have to push down a lot and press in the center. Be careful not to overfill. When it says teaspoon, that’s just about perfect. Transfer filled wrapped to prepared baking sheet and coat surface with cooking spray.


Bake until wontons are golden brown, about 15 minutes. Serve with ice cream if you choose or just gobble them up.

Tuesday, January 27, 2009

Mighty Sausage Scalloped Potatoes

Yesterday, while drilling my brain with math drills and vocab, Aaron went out shopping and came home with far too much food, including lots of cheese (which was on sale). So he took it upon himself to find a cool recipe for the copious amount of cheese we have and Zenner’s sausages. While I still don’t eat a lot of meat, I find these to be pretty dang tasty. I first had them over at my friend Carrina’s house (she has a blog now too! Go check it out here) and really, really enjoyed it. It’s spicy, but not too spicy, and adds a great amount of flavor to the food.

Anyway, this was the recipe my dear husband found. What I really like about it was how versatile it is. You can skip the sausage altogether and just add some of your own herbs if you’re not into meat. Or replace it with chicken sausage, something I usually prefer. After eating it, Aaron and I came up with lots of ideas of how to modify it. Shredded chicken, for example, would be a great substitution. I think adjusting some of the herbs to taste would be great and maybe a little bit of garlic. Ah, who am I kidding? Yes garlic. In any case, I’m glad he made this and it’ll work its way into our rotation.

Mighty Sausage Scalloped Potatoes from zenners.com:

Serves about 4-6 dinner portions or 6-8 side/appetizer portions

Five Russet potatoes, peeled, boiled, thinly sliced (ours were huge, so we used two huge ones)
2-3 Zenner's Sausages of your choice, thinly sliced on the bias (just the two)
1 ½ c. cheese (1 c. Monterey Jack and ½ c. medium cheddar)
1 c. milk
2 Tb. butter, oil or margarine (butter works very well because you’re going to make a roux)
2-3 Tb. flour
1 Tb. dried parsley
Salt and Pepper
1 cup frozen green peas (optional. We did not go with this)


Begin to simmer or low grill any uncooked sausage. Peel and boil potatoes until just cooked, then cool and thinly slice. The just cooked part takes about 10 minutes, depending on the size of your potatoes. Melt butter in sauce pan, then whisk in flour, turning heat up to medium or so until cooked, then slowly whisk in milk, salt and pepper and parsley until slightly thickened. Using square or rectangle glass or non-stick pan, layer potatoes, thinly sliced sausage, sauce and cheese, reserving half cup of cheese for top.


Bake 40-50 minutes at 375 degrees; broil top if a more rustic crust is desired, cover with foil until last ten minutes if less is desired. 45 minutes is just about perfect in our oven. The top sausages did get a little crispy, but it was all good and very delicious. We had ours with steamed broccoli (with all that cheese and such, you need some greens) and again for lunch with mixed greens.

Sunday, January 25, 2009

Raisin Pine Nut Sandwich

I’d like to apologize for my sporadic posting lately. I’m studying for the big, bad GRE and that’s coming up February 7. As a result, I seem to be less interested in cooking or rather less interested in cooking fun, new things. After that thing is done, though, I will hopefully be doing this more because cooking meals and eating food are much more fun activities than analogies and quantitative comparisons. Trust me. Anyway, so here’s a sandwich post because I haven’t made anything interesting in days. But it has a fun story behind it!

Most of my childhood involved Rainbow Foods. My mom worked there for years and on Take Your Daughter to Work Day (when it was still just daughters), that’s where I went, pricing gun in hand. At 14, I started working there and did so until I moved down here to Portland in 2002. I loved that place. One of my very favorite things, besides all the fabulous people, customers, and atmosphere, was the deli. There was always an incredible array of salads, hot dishes and sandwiches for me to choose from on my lunch break. One of my very favorite sandwiches in my final year at Rainbow, was one made with dark, chewy bread, pine nuts, cream cheese and raisins. When I made the dark pumpernickel bread the other day, this was the sandwich I had in mind.

As it turns out, the bread wasn’t quite right for it. I will have to try again with another dark bread. I do think the big problem was, as I mentioned back in my post about the bread, that the cocoa flavor is a bit overpowering. While it was tempered a bit by the cream cheese, it still wasn’t quite what I was looking for. Still, it wasn’t a bad sandwich. I’d eat it again. It just didn’t get me back to those days when I’d grab a sandwich from the cooler at Rainbow and then race out to the university for classes. I’ll keep trying though. And if you’re ever in Juneau, Alaska for whatever reason, go by Rainbow. It’s pretty awesome.

Raisin Pine Nut Sandwich from Rainbow memories:

Handful of pine nuts
Handful of raisins
Plenty of cream cheese (~1/4 c.)
Two slices of dark, chewy bread

Toast the pine nuts briefly in a 400 degree oven. Do this only for a couple of minutes or they will burn.


Cut slices in half. Spread cream cheese over both sides. Sprinkle toasted pine nuts and raisins. Enjoy alone or with veggie spears.

Saturday, January 24, 2009

Buttermilk and Applesauce Blueberry Pancakes

There are some nights when you just can’t wait to go to sleep, wake up the next morning and make breakfast. When that sort of mood strikes, pancakes are always at the front of my mind. I won’t be knocking pancakes mixes here because I know there are some good ones out there, but I never use them and my parents didn’t either. Making pancakes from scratch really doesn’t take a lot of extra work and the results are worth it.

I have two varieties here, but they come from the same place. I first mentioned SACO Buttermilk powder back in this entry. It has the best pancakes recipe I have ever used and now it’s the only one I ever use. I made up a stack of pancakes for Aaron and then mixed in some extras for me. The results of that second stack were the applesauce blueberry pancakes you see here. Both are fantastic, especially with a side of turkey bacon.

Buttermilk Pancakes from the SACO Buttermilk tin:

Makes enough cakes for at least 4 people, depending on what you serve it with.

4 Tb. buttermilk powder (or use a ¼ c. buttermilk if you have it)
1 c. all-purpose flour (whole wheat is great here, replacing half of the all-purpose)
1 Tb. granulated sugar
1 tsp. baking powder
½ tsp. baking soda
¼ tsp. salt
1 egg
1 c. water
2 Tb. vegetable oil

Add the following for the applesauce blueberry pancakes:
¼ c. applesauce
¼ - 1/3 c. fresh, frozen or wild dried blueberries (like from this recipe)

Mix the buttermilk (if powdered), flour, sugar, baking powder and soda, and salt in a medium mixing bowl. If you are not making any straight buttermilk pancakes, add the blueberries if they are dried.

In a small mixing bowl, whisk together egg, water, vegetable oil and buttermilk (if using liquid). Add the applesauce and fresh or frozen blueberries. If you are making regular buttermilk pancakes first, hold the applesauce and blueberries. Mix the wet ingredients into the dry until well combined, taking care not to over mix or overbeat. It should still be a little lumpy. If you are making a half and half mix of pancakes, make the buttermilk ones first and then mix in the applesauce and the blueberries just before making the next set of cakes.


Heat a greased medium pan or skillet over medium-high heat. Drop batter in whatever size you’d like your pancakes to be on the pan once it is hot. You may need to turn the heat down as you make more pancakes. Watch it and you won’t have any burned cakes. When the edges have browned a bit and the top is covered in small, breaking bubbles, flip it and cook for about 1 minute more.

Be careful with the applesauce ones. They will spread a little more than the buttermilk ones.


Serve immediately and enjoy.

The batter keeps fairly well for a couple of days. It won’t be nearly as fluffy though. Take it out and let it warm up a bit while you get everything else ready. Mix it a bit and continue as above.

Wednesday, January 21, 2009

Dark Pumpernickel Bread

Of all the breads I have made so far, none have been the dark, chewy loveliness that is pumpernickel. I got the idea in my head the other day to make a dark bread for a particular sandwich I had thought of, so I went through me new cookbooks (isn’t that always the way?) and found this one. I remove the caraway seeds and ignored the onion because although the savory/bittersweet combo sounded very tasty, it didn’t really go with what I was making it for in the first place. This bread is recommended to be eaten with ham and mustard, a selection of good cheeses, and some fresh fruit. However, so far I’ve only had it with butter fresh out of the oven and for my sandwich. It’s still pretty dang good though.

Dark Pumpernickel Bread from The Fiddlehead Cookbook:

Makes 1 free form loaf/regular loaf or two cocktail loaves

1½ c. warm water
6 Tb. molasses
1½ Tb. dry yeast (1½ packages)
3 Tb. unsweetened cocoa
1¾ c. rye flour
1 c. unbleached white flour
¾ c. whole wheat flour
1½ Tb. oil
1½ Tb. caraway seeds (I did not use these)
¾ Tb. salt (I used kosher)
2 Tb. finely chopped onions (optional. I also did not use these)
1/3 to ½ c. unbleached white flour as needed
Cornmeal
1 egg
1 Tb. water

Place water in a large mixing bowl or the bowl of an electric mixer fitted with a dough hook and dissolve molasses in it. Add dry yeast and allow to set, or “bloom”, for 3 to 5 minutes, until it is bubbling and active.


Stir in cocoa, then add rye flour and 1 cup white flour. Beat until smooth and allow to rise for 30 minutes in a warm spot. Add whole wheat flour, oil, caraway seeds (if you’re using them), salt and optional onion. Knead for 10 minutes, until dough forms a smooth, spongy ball, slightly sticky to the tough. I didn’t need the full 10 minutes. It responded very quickly. Add additional white flour only as needed to bring dough together. Place in a large well-oiled bowl (clean out your mixer bowl and just use that), turning dough so that it become lightly oiled on all sides. Cover loosely and let sit in a warm spot until doubled in bulk and dough does not spring back when lightly touched. This should be about 1½ hours.

Punch down. If you have time, allow dough to rise until doubled again. (It will take half the time of the first rising).

Turn dough out onto a very lightly floured surface and knead into a smooth ball. Cover loosely and let rest for 5 minutes.

Lightly oil a large cookie sheet. Sprinkle with cornmeal. Preheat oven to 350 degrees.

I did not shape the dough with the following directions. Rather, I shaped it into a large ball and left it as a free form loaf. I have some issues with shaping anyway, but I do like the way free form loaves look. If you do decide to shape it, this it what they said: Roll or pat dough into a 12-by 8- by 1½-inch-thick rectangle. Beginning from the narrow end, roll up tightly, tuck in ends, pinch seams together, and roll lightly to even out the load.

Place loaf, seam down, on cookie sheet. Cover loosely and let rise in a warm spot until double in bulk (about ½ hour).


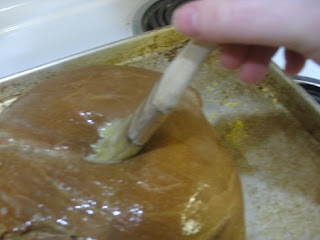
Beat egg with water and brush over loaf. Using a very sharp knife or kitchen shears, make 3 diagonal cuts in top of loaf. Bake for 35 to 40 minutes, until loaf is crusty and hollow sounding when tapped on bottom. Remove from oven and place on a rack to cool. Wrap lightly and store at room temperature or freeze to eat later.

As I did modify this, I do have a couple of things to add. If you do it with the onion and caraway seeds, it may be better to reduce the cocoa powder by half. Without the contrast, the cocoa takes on a nearly overwhelming flavor. It just goes to show that you can’t always win when you modify something before you try it. However, this bread did still turn out very well and I will have to try it the way it was meant to be made.

Tuesday, January 20, 2009

Kitchen Sink Sauce

Ever have one of those nights where you’re planning on making dinner and just have no idea what to do? Yeah, that was me last night. So I just grabbed a bunch of stuff out of the fridge and starting making things up. I tend to do this with a pseudo-Italian bent and it often consists of many of the same things. I decided that this is my kitchen sink sauce, which means I throw everything into a sauce except for the kitchen sink, and just go crazy from there.

This time around it came out really good. I did it with fusilli, but this would work well over grilled chicken (minus the sausage) or alongside potatoes. You can very easily just not use chicken sausage and go all veg with it. Go crazy. Add stuff, take stuff out. Use what you have. It’s fun.

This is what I did:

Makes at least 4 portions

5 cloves garlic
Handful fresh parsely
½ tsp. lemon juice
Large head of broccoli, cut into florets
1 small green pepper, cut into strips (any color will do. Mix it up and make it pretty!)
½ large sweet onion, cut into rings (Walla Walla, Vidalia, Maui)
2 cubes (about 3 oz.) vegetable stock (I used some I had already made and frozen into ice cubes)
2 chicken apple sausages, sliced
Olive oil
Parmesan cheese
Fusilli noddles (or penne)

Mince garlic and parsley together. Sprinkle with lemon juice and set aside.

Boil water and cook pasta. Drain and set aside, keeping it warm.


Place onions in a medium saucepan, toss with olive oil and cook over medium-low heat until transparent, but not browning, about 5-10 minutes. Add the green pepper and cook for about 5 minutes more, until onion is beginning to brown. Add the broccoli, vegetable stock and garlic-parsley mixture and cook, covered, for about 10 more minutes, or until green pepper has softened. If you want to broccoli less firm, add it sooner. Add the chicken sausage and cook for another 5 minutes or until sausage is warm.


Toss with pasta and parmesan cheese.

I think the veggie stock gave the sauce a nice depth. If I had had more stuff in the house, snap peas would’ve been a great addition. Just use lots of complimentary vegetables and you’ve got something great going on.

Wednesday, January 14, 2009

Honey-Yogurt Scones

The Fiddlehead Restaurant, which I mentioned back in this post, had a fantastic bakery. The food there was also very good, but the bakery was where it was at. In particular, their scones were to die for. When my good friend Hannah (she also gets credit for the Moosewood Cookbook from the Broccoli-Cheddar Pie post) sent me their cookbook for the holidays, I flipped right to the baked goods section to make sure it was there. Sure it enough, there they are. I made two batches, the first without anything extra and the second with wild dried blueberries instead of currants. The first set didn’t have anything in it because I just wanted to make them so badly and didn’t have any of that stuff available. The second batch was made a little later when I realized that the 6 I had made were not going to make it over to my friend’s house and I wouldn’t be able to share.

These are ridiculously easy to make. All told, it takes about half an hour and then you have warm, yummy scone goodness to eat. I will be making these in a bunch of new varieties soon. They are that good.

Honey-Yogurt Scones from The Fiddlehead Cookbook:

Makes 6 scones

4 Tb. butter
1 Tb. honey
½ c. plain yogurt (substitute sour cream or buttermilk if necessary. I used Nancy’s yogurt because it’s just so good)
1 egg
1¼ c. unbleached white flour (for delicious nutty flavor, decrease to 1½ c. flour and add ¼ c. graham flour. I did not do this)
½ tsp. baking powder
½ tsp. baking soda
¼ tsp. salt
¼ c. dried currants, dried cherries, pecans, or raisins. Or wild blueberries! Thank you Trader Joe’s!
1 egg, beaten (optional. I didn’t do this because I don’t like my scones shiny).

Preheat oven to 400 degrees and place rack in center of oven.

Melt together butter and honey in a small glass bowl in microwave, or in a small pan on stove over medium heat. Remove from heat and whisk in yogurt and egg. I did the latter as I don’t have any glass bowls and I like doing stuff on the stove anyway.


In a medium size mixing bowl, sift together flour, baking powder, baking soda, and salt (or just mix them together…I don’t have a sifter.) Stir in blueberries. Pour egg mixture over flour mixture and, using a fork, very gently cut together until dough is beginning to come together but is not quite completely combined.


Turn out onto a lightly floured surface and gently pat into a 6-inch circle. Fold dough in half and pat out again. Repeat two or three more times, taking care not to over work or knead the dough. Pat into a 1-inch thick circle (about 6 inches in diameter) and cut into 6 wedges. Place on an ungreased baking pan. Brush lightly with egg (optional) and bake for 12 to 15 minutes, until puffed and golden brown.


Remove from oven and serve immediately with lots of butter and homemade jam. Try not to eat them all at once.

Monday, January 12, 2009

Broccoli-Cheddar Pie

For the holidays this year, I was quite fortunate and received three new cookbooks. Among these was The New Moosewood Cookbook, which is filled with fun vegetarian recipes. I tried my first one tonight and man, it was good. Of course, I modified it a bit. The recipe below was originally called Cauliflower-Cheese Pie, but my husband isn’t a huge fan of cauliflower, so I subbed in broccoli. I think it gives the pie a nice color contrast. Plus, I love broccoli. This was make for a great lunch/dinner/potluck dish. I was very, very pleased.

Broccoli-Cheese Pie modified from Cauliflower-Cheese Pie in The New Moosewood Cookbook:

4-5 Servings

Crust-
2 c. (packed) grated raw potato
½ c. grated onion
½ tsp. salt (I used kosher)
1 egg white, lightly beaten
Flour for your fingers
A little oil (I used extra virgin olive oil because of its great flavor)

Filling-
1 Tb. olive oil or butter (I used olive oil)
1 c. chopped onion
2 medium cloves of garlic, minced (It was more like 4)
½ tsp. salt (kosher, again)
½ tsp. basil
¼ tsp. thyme (both dried)
1 medium broccoli, cut into small pieces
2 eggs or 1 whole egg plus 1 egg white (I went with the two eggs)
¼ c. milk (I used 1%)
1 c. packed grated cheddar
Paprika

Preheat oven to 400 degrees. Oil a 9” pie pan.

Combine grated potato and onion, salt, and egg white in a small bowl and mix well. If you have a food processor, you can make quick work of this pie. Grate the cheese, potato, and onion in that order. You don’t need to clean in between. I don’t have one, however, so I did it by hand. Transfer mixture to the pie pan and pat into place with lightly floured fingers, building up the sides into a handsome edge.


Bake for 20 minutes, then brush the crust with a little oil and bake it 10 more minutes. Remove from oven, and turn the temperature down to 375 degrees.

While the crust is baking, prepare the filling. Heat the olive oil or butter in a large skillet. Add onion, garlic, pepper, and herbs, and sauté over medium heat for about 5 minutes. Add the broccoli, stir, and cover. Cook until tender, stirring occasionally (about 8 to 10 minutes).


Spread half the cheese onto the baked crust (OK if it’s still hot). Spoon the sautéed vegetables on top, then sprinkle on the remaining cheese. Beat the eggs and milk together, and pour this over the top. Dust lightly with paprika. Bake 35-40 minutes, or until set. Serve hot or warm.


My husband, ever the meat eater, suggested mixing in some chicken next time. I think it would go rather well. This seems to be a recipe that can be adapted and modified all over the place. There are leftovers, but I don’t know how long they will last.

Sunday, January 11, 2009

Pummelo

This one isn’t actually about cooking or even garlic. It’s to proclaim my undying love to my very favorite fruit, the pummelo. If you’ve never heard of it before, check out this article. (I love you wikipedia). It’s like a grapefruit, but bigger and sweeter. I don’t have them very often, but I always am so very happy when I do. I never cook with it either. It never goes into fruit salad. I never experiment. I just eat it standing up in the kitchen. Winter is a great time for citrus and this is my very favorite kind of citrus.

The pummelo is part of why I wanted to do this blog. I wanted to share my love of food and although this isn’t cooking, I really do love this fruit. Go find it and eat it. You’ll be happy you did.

Wednesday, January 07, 2009

Oven Baked Fries and Stuffed Buffalo Burgers

This entire meal was my husband’s idea, which I loved. All I had to do was prep. Although I don’t eat much meat, I do really enjoy buffalo. My hubby makes a mean buffalo burger, which is a good alternative to beef and a nice change from turkey from time to time. This all came out very well and it’s nice to know how to do fries. Especially when I can just do prep and watch him make it! The original fries recipe can be found here.

Oven Baked Fries modified from recipezaar.com and Stuffed Buffalo Burgers:

Makes 2 large servings

About 2 small heads of garlic plus a few cloves, minced, for both the fries and burgers.

Fries-
2 large baking potatoes, cut into thin strips
1 Tb. olive oil
1 tsp. kosher salt
1 tsp. paprika
Freshly ground pepper, to taste

Burgers-
2/3 lb. ground buffalo
½ - 2/3 c. finely shredded cheddar cheese (or cheese of choice)
¼ of a medium yellow or white onion, chopped
1 Tb. steak and chop spice mix (Trader Joe’s makes an excellent one or your choice of spices)

Heat oven to 450 degrees.


Spray a baking sheet with cooking spray. Combine all dry ingredients with potatoes in a medium size bowl and toss to coat. Add olive oil and ½ of the minces garlic, tossing again to coat. Arrange potatoes in a single layer on baking sheet and for about 35 minutes or until golden brown.


For the burgers, mix the buffalo, the next three ingredients and the rest of the garlic together in a small bowl. Form into two patties. You can do this while the fries are baking. About 10 minutes before they are done, heat up olive oil in a medium saucepan. Place burgers in when the oil is hot. Cook for about 5 minutes per side, until browned and cooked through.


Garnish burgers and serve with fries. The fries taste awesome on their own, but do go well with ketchup and other traditional fry sauces.

Sunday, January 04, 2009

Cheddar Broccoli Soup

Bread and Honey is one of my very favorite food blogs and part of that is because they are in Portland too. So as these girls went through Snowpocalypse 2008, so did I and soup was totally on the mind. Granted, I did not actually get around to doing this recipe until after the snow had melted, but it’s still cold, so that’s that. Plus, I had to wait for my stock to thaw.

I made a few changes, as I tend to, so you can check out the original here. The pictures are much nicer anyway. This soup was made possible by my dear husband not only grating all of the cheese, but preparing an appetizer for our guests while I made the soup behind schedule (stupid studying!). He’s such a good guy. This soup is even better the next day, just make sure you warm it up slowly on a double boiler or it will separate.

Cheddar Broccoli Soup from Bread and Honey: A Food Blog:

Serves at least 6

1 pound of cheddar cheese, grated finely
1 finely chopped onion
4 cloves minced garlic (because I love garlic)
"a big chunk of butter" (for me, this ended up being about ¼ c.)
a handful of flour
3-4 c. of stock (Mine was about 4 cups, veggie, from this recipe)
1 cup of milk
4 smallish heads of broccoli, chopped into small bites (I wanted it extra broccoli-y)
bay leaf
a little bit of white pepper


Lightly steam and blanch the broccoli. Set aside.

Here is where things got a little different. In the original, the onion and garlic is sautéed and flour added to make the roux. I started making the roux and forgot to cook the onion and garlic. So, after the roux was toasted and set aside, I quickly cooked up the onion and garlic with a bit of olive oil until glassy in a separate pan and added that to the roux.

To make the roux, melt the hunk of butter in a large pot and toss in bits of flour at a time. Whisk until you have a roux and continue to cook until slightly toasted. Add in the cooked onion and garlic. Then add the stock a little at a time, whisking continuously. Add the milk in the same manner. Add the bay leaf and then the cheese, much like the stock and milk. Season with white pepper (just a little or it gets a weird taste) and stir in the broccoli. Cook until the broccoli is warm and the soup has thickened a little.


Serve immediately. We had ours with some French bread and it was fabulous. I also had some last night with garlic toasts and that was also quite wonderful. This is the first Bread and Honey recipe I’ve tried, but after ogling the pretty photos and tasty recipes, I’ll have to actually make some more.

Friday, January 02, 2009

Peanut Butter M&M Cookies

I have been told a number of times, mostly by my husband and former roomie, that I make amazing chocolate chip cookies. The thing is, I don’t really do anything special. The recipe I use is on the back of the chocolate chip bag and I never change anything about it. So what follows here is less a recipe and more tips on what I do specifically that might make your chocolate chip cookies a little more fantastic. I replaced 1½ cups of the chocolate chips with peanut butter M&Ms as my husband and I had part of a bag left over from when we snuck some into the movie theater the other day. The other ½ cup I did with mini chocolate chips so they wouldn’t be too obtrusive and also because I have a bunch left over from this project.

Peanut Butter M&M Cookies (basic recipe from the back of the chocolate chip bag):

Makes about 24, but I rarely get the same amount as I like cookies of varying sizes

2¼ c. all-purpose flour
1 tsp. baking soda
1 tsp. salt
1 c. (2 sticks) butter, softened
¾ c. granulated sugar
¾ c. packed brown sugar
1 tsp. vanilla extract
2 large eggs
1½ c. peanut butter M&Ms
½ c. mini chocolate chips

Preheat oven to 375 degrees.


Before getting started, take your butter out of the fridge and let it get soft. This is part of how it will get really creamy and make your cookies extra chewy and delicious. Take it out and go do something else for a bit. Set it on top of the warming oven. Come back when it’s softened. I use my KitchenAid for the whole process and it makes quick work of it. Muscle power, a bowl and a spoon also work well. Cream one stick of butter and then the other. Let it get really soft and whipped up.

In the meantime, mix the flour, baking soda and salt into a small bowl. Set aside. Once the butter is really creamy, add in the granulated sugar. Once that is fully incorporated, add the brown sugar. Again, wait until it is incorporated and then add the vanilla. Once everything is well mixed, add in one egg and then the other, again waiting until the first egg is incorporated before adding the second. Slowly add the flour mixture. Wait until each little bit is mixed in before adding more. Patience is key here. Once that is fully mixed in, add in the peanut butter M&Ms and the mini chocolate chips. Once it’s fully mixed, you’re ready to get them into the oven.


Lightly grease at least two baking sheets. When I say lightly, I mean lightly. If you use too much grease, the cookies will spread too much and they’ll stick together or become too thin or too crunchy or all of the above. Using a spoon, take out a tablespoon-ish sized blob and place it on the baking sheet. I sometimes use a spatula and form a palm sized ball in my clean hands and then put it on the sheet. I have small hands, so they don’t end up huge. Make sure you don’t place them too close or they’ll stick to each other. This time, I had 12 cookies on each sheet. In the past I have ended up with fewer because my roommate would not only be stealing cookie dough while I was making it, she’d also steal it from the pan. It is pretty dang good.

Place one sheet on the middle rack of your oven. Bake for about 10 minutes. It will depend on your oven and how big you made the cookies, but you need to watch this. It can go from underdone to over baked very quickly. The outer edges will be browned and the centers will have fallen in slightly. In short, they look like cookies instead of blobs.


Cool on a rack while the other sheet bakes. Don’t remove them from the pan too soon (unless you’re eating them warm, which does taste amazing) or they will stick to each other on the plate. Wait until they have cooled and then put on a plate. These were, for some reason, even better than last time. It may be the M&Ms adding a little somethin’ somethin’. In any case, I made these Wednesday night for NYE and they barely made it to New Year’s Day. They did not make it to today.

This is a really fast recipe and it tastes so good. I highly recommend it for that last minute party you got invited to or when your fiancé and roommate are staring at you and begging you to make cookies.

Thursday, January 01, 2009

Crab Cake Benedict

I really wanted to start the New Year off well, so I decided to make a fancy breakfast for my husband and me this morning. Last night I made some murmurings about eggs benedict before bed and my husband kindly reminded me this morning. I’ve made hollandaise before, but never really attempted poached eggs. Some books make it sound so complicated, but as I learned today, it’s really not that hard.

To make it a little more fancy (and also based on what I had on hand this morning), I decided to go with crab cakes benedict. One of my most favorite breakfast places in Portland is Milo’s. If you haven’t been, go now. They do delicious benedicts, including a wonderful crab cake version. I was inspired by this as well as by a recipe in one of my new cookbooks, The Fiddlehead Cookbook, which is filled with recipes from The Fiddlehead Restaurant, a delicious place that used to exist in my hometown. Their description of poached eggs is how I was finally able to figure it out.

It was a good morning. I highly recommend eggs benedicts for fancy breakfasts. It takes a little time, but it looks beautiful and tastes amazing.

Crab Cake Benedict inspired by Milo’s/Crabby Eggs from The Fiddlehead Cookbook:

Serves 2 with extra sauce

Hollandaise Sauce-
3 eggs yolks
2 tsp. lemon juice (I used closer to 4 as I, like my friend Lindsay, prefer a very lemony sauce)
1 c. (2 sticks) butter, cut into small pieces

4 eggs
1 Tb. white wine vinegar

4 small slices of bread or 4 english muffins (I used slices of no-knead bread. It was perfect.)

4 crab cakes (I used this recipe, slightly reduced to make 4)

Prepare crab cakes first. Keep them warm on the pan or in the oven. I was also making country fried potatoes and needed the stove space.


Start the hollandaise. Prepare a double boiler with gently simmering water over low heat. Place egg yolks in top of double boiler and add lemon. Whisk until egg mixture is fluffy, about 1 minute. Continue to whisk gently, adding butter about 1 teaspoon at a time. When at least 6 teaspoons have been added, begin to add butter by tablespoons. This allows it to emulsify properly. If you add too much butter too quickly, it creates too much liquid and won’t be the right consistency for the sauce. Thoroughly incorporate each addition before adding more. I generally remove the top of the double boiler about half way through the butter process to ensure that the sauce does not become too warm and separate. Cover and keep warm until ready. You may need to whisk it a couple more times just before serving.


Lightly oil a large pan and fill with water to a depth of about 1 inch. Add vinegar to pan and bring to a boil over high heat. Reduce heat to a very low simmer. Crack each egg into a small bowl and gently slide it into the barely simmering water. Cover the pan and cook for 4 minutes. You can do it longer if you like harder yolks, but I don’t.

While the eggs are poaching, toast your bread/muffins.


Remove the eggs from the water with a slotted spoon and place on plate/tray lined with absorbent towels. Trim the ragged eggs, if you so choose.


To assemble, place a crab cake on each slice of bread/muffin and add an egg on top of the crab cake. Spoon hollandaise over the top and serve at once with your favorite breakfast side dish, like fried potatoes.

As for the extra sauce, it can be refrigerated and reheated later. To do so, place the sauce in a double boiler and reheat in the same manner it was made: slowly over simmering water. Don’t do it too quickly or it will separate. Hollandaise is great over vegetables or other, simpler breakfast meals. Try it on a breakfast sandwich! It’s just so dang tasty.
Related Posts Plugin for WordPress, Blogger...