Friday, March 27, 2009

Basil-Macadamia Nut Pesto

Macadamia nuts are ridiculously delicious. I could not stop eating them while prepping this recipe and I had a hard time putting the few leftovers away. I should find more recipes using them just so I can have them around. Or maybe not. I’d probably eat them all before I got around to making anything with them. I did see a recipe the other day on Good Eats with macadamias that looked fabulous, so I might look into that.

Anyway, this recipe is from my massive list and comes from this very cool Polynesian cookbook my aunt sent me years ago for my birthday/love of Kauai. I was not really into cooking much at the time, or at least not often, so the book sat with many others, collecting dust and just being sad in general. Well, no more (obviously). I love the fresh twist on pesto and any excuse to cook up salmon and eat macadamias is fine by me.

Basil-Macadamia Nut Pesto from Sam Choy’s Polynesian Kitchen:

Yield: 1¼ c.

½ c. fresh sweet basil leaves, chopped
3 cloves garlic, minced (I went to 4)
¼ c. chopped parsley leaves
1 Tb. lemon juice
Salt and pepper to taste
1 c. canola oil (I subbed in regular olive oil as I don’t have canola oil about)
½ c. minced roasted macadamia nuts


The original directions say to mix all of this in a blender. I decided to use my mini prep food processor because it would cut down on prep time and I just love using it anyway. Plus, it’s easier to clean. I chopped the nuts first, then the basil leaves and parsley, cleaned it out, and minced the garlic. In a blender (or mini prep food processor!), add all the ingredients, except the nuts. Blend. Add the nuts to the mixture and blend for a few seconds. Keep in the refrigerator, or store in the freezer until needed.


According to the book, it works well over any fish or chicken, or with a plate of pasta. I had mine with pan seared sockeye salmon (Alaskan, of course) and some grilled onions. It went fabulously. Although not radically different from traditional pesto, there is a slightly different flavor to it. I liked the bigger chunks of nuts in it and also the lack of cheese because that made it better for fish. I know, I’m surprised I said I was glad about a lack of cheese too. But really, it goes with fish so much better.

PS: Look at my pretty plating. I’ve been watching Chopped too much.

Thursday, March 26, 2009

Roasted Shallot Mashed Potatoes, Stuffed Chicken Breasts, and Balsamic Reduction

Balsamic vinegar is wonderful. Sometimes I come up with dinners that work around it just to make sure I can have some. Most of the time I just have it with fresh greens and olive oil. I already had the plan for the mashed potatoes (thanks Aaron!) and wanted to make something fancy around it. The thing that’s funny about this is that although the whole meal sounds kind of fancy, it’s really easy to do and doesn’t take that much time. Cheater, cheater!

This is what I did:

For the potatoes –
2 large russet potatoes
A hunk of butter
A splash of milk
2 shallots
Olive oil
Pepper to taste

For the chicken-
¼ c. ricotta cheese
A hunk of yellow onion, chopped
3-4 cloves of garlic, minced
Kosher salt and freshly ground pepper to taste
A bit of flour to dredge
Olive oil

1/3 c. balsamic vinegar for the reduction


Heat oven to 350 degrees. Peel the shallots and place in a baking dish or muffin tin, drizzle with olive oil, and cover with foil. Bake for 30 minutes, remove the foil, and bake for another 20. When they are cool enough to handle, rough chop them and set aside. You can also use this method for roasting garlic, which is fantastic.

Follow mashed potato directions from this post and mix in roasted shallots at the end.


For the chicken, heat olive oil in a small saucepan and add onion and garlic. Cook until onion is glassy and soft, which should only be a few minutes. Add ricotta to a small bowl and mix with onion and garlic. Set aside. Flatten the chicken a bit and cut open the breasts. Cut so there’s a pocket, but not all the way through. I know the picture looks kind of gross. Just go with it. Stuff in a bit of the ricotta mixture and close the pocket. Just eyeball it. Lightly season each side with salt and pepper. Dredge with a bit of flour for a crispier crust.


Heat olive oil in a medium saucepan over medium-high heat. Sear on both sides, about 2 minutes each. You want a nice, brown crust. Reduce heat to medium-low and cover saucepan. Cook through, about 10 minutes.


The reduction is the easiest part. Add the balsamic vinegar to a small saucepan and bring to a boil, then reduce to a simmer. Let cook until most of the liquid is gone. Mine took about 7 minutes, but it will really depend on your stovetop. Drizzle over chicken, potatoes, anything else you want. It is so, so good.

The timing of this meal was a bit difficult and the potatoes ended up being a wee bit cold. Bummer, I know. The potatoes don’t really take very long to cook and if you have a mixer, the rest is so easy. Next time I’ll start the potatoes a bit later and have the chicken all prepped and ready to go sooner. All in all though, this was a tasty meal.

Tuesday, March 24, 2009

Petisco

I've been meaning to blog about this place for ages (okay, a few weeks), but kept forgetting (so me!). Anyway, Petisco is a very, very tasty and new sandwich place very close to my house. I discovered it through the hive mind that is the livejournal community DamnPortlanders. One recommendation and one half of a turkey and brie sandwich on baguette with potato cheddar soup later, I was hooked. I ate there twice in one week. I think about it all the time! Well, okay, not all the time, but often.


I've had the turkey and brie, which comes with honey mustard and is to die for. I've also had the tomato and mozzarella, which is also amazing. Carrina has had the roast beef with manchego cheese, or rather, as she said, "Make that rare roast beef with manchego and HORSERADISH CREAM!" What makes Petisco so good is very high quality ingredients at not such a ridiculous price. I love cheese (check the bio) and I love it when restaurants care about their cheeses. The bread is crunchy and perfect, the cheeses are creamy, the meats are perfectly salted. The side salad is substantial and tossed with a nice olive oil and balsamic vinegar. The soups are also amazing. I've yet to check out brunch, but I'm sure I will soon.

The sandwiches are like a siren song, calling me. I'll be back and not just because the brie is so delicious.

Raspberry and Cream Cheese Bread plus French Toast

This delicious bread recipe comes courtesy of my ambitious list of recipes that I am slowly working through. Originally called Blueberry and Cream Cheese Bread, there is a note underneath that says raspberries, strawberries, or blackberries can be substituted, which is what I did. I think the marbled red with the whiteness of the bread is so pretty and it is very, very tasty.

The main reason I did this recipe, though, was due to the other half of the note which states “this marbled bread makes terrific French toast.” So that’s what I did (and documented!) and it was quite terrific.

The only issue I had at all was the top of the bread being a teeny bit burnt. I did it on the low side of the bake time and should have been checking on it due to all the mushy fruit on top. It was only a little burnt, though, and hardly affects the flavor. Just be more careful than I was!

Raspberry and Cream Cheese Bread modified from Blueberry and Cream Cheese Bread from Flavored Breads:

Yield: 1 loaf

8 oz. cream cheese
2 Tb. sugar
2 Tb. butter, softened
2 eggs
1 c. lukewarm water
2 tsp. active dry yeast
4 c. bread flour
1½ tsp. salt
2 c. raspberries (I used frozen, defrosted and drained)

In the bowl of a heavy-duty electric mixer fitted with a flat beater, cream together the cream cheese, sugar, and butter. Add the eggs and cream for 1 minute longer.

Place the water in a separate bowl. Sprinkle the yeast over the water, stir in, and let sit for 2 minutes. Add the yeast to the cream cheese mixture. Add the flour and salt (I mixed the two together beforehand) and mix with a dough hook (or knead by hand) for 4 to 6 minutes, or until dough is smooth and elastic. As usual, I started this in the mixer and finished it off by hand. It goes faster and you still get the joy of kneading bread.

Transfer the dough to a lightly oiled bowl (for example, a cleaned out mixer bowl that you just used) and cover with plastic wrap. Let rise in a warm place for 1 hour, or until approximately doubled in volume.


Carefully fold in the raspberries into the risen dough until evenly incorporated. Turn out onto a lightly floured surface. From here he goes on to have you form a round loaf. Instead of doing this, I just shaped it square and dropped it into a square baking pan.

Anyway, shape the loaf how you please (it’s really only a suggestion) and lightly butter or oil a 10-inch square baking pan or cake pan with sides at least 2 inches high and dust with bread flour. Place the loaf seam side down in the pan. Cover with plastic wrap and let rise in a warm place for 20 minutes, or until approximately doubled in volume.


Preheat oven to 400 degrees. Uncover the loaf and bake for 35 to 40 minutes, or until dark brown. Let the bread cool in the pan for 10 minutes. Turn the loaf out onto a rack to finish cooling. I left mine in the pan because when I tried to take it out, it bent funny and raspberries got all over the counter. It was fine.

So! French toast. It’s delicious. In case you don’t know how to do it, it’s really easy, and it makes good use of stale bread. Or this bread. Anyway, this is what I did for 2 people:

2 eggs
¼ tsp. salt
½ c. milk
Splash of vanilla extract
Dash of cinnamon
3 slices of raspberry and cream cheese bread, cut in half
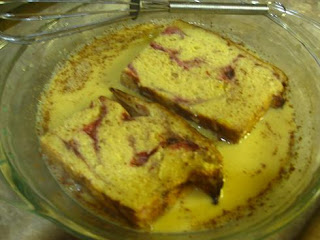


In a pie pan (this work out perfectly, but any flat dish with sides will do) beat eggs slightly, add salt and milk, flavor with vanilla extract, and add cinnamon to taste. Dip the bread into the mixture, coating on both sides. I like to let one set sit while I cook another and the flip them when I flip the ones in the pan.


Brown the bread, each side, on a hot, well-buttered griddle or pan. It only takes a couple of minutes for each side. Serve hot with your choice of syrups. It’s a very sweet way to start a day and I love that. Daaang! So good!
Sunday, March 22, 2009

Not a Breakfast Burrito

The more I cook, the more I want to. So when my husband said he was hungry the other night, I jumped up, ran downstairs and dug through the fridge to find something interesting to make. What I came up with was dubbed “Not a Breakfast Burrito” by my husband, but I think it was more like not a breakfast taco or tostada.

This is what I did:

About 2½ cups broccoli
¼ finely shredded cheddar cheese
2 corn tortillas
2 fully cooked mango sausages
¼ yellow onion, sliced and cut into half rings
2 small red potatoes
3 cloves garlic
Olive oil

Preheat oven to 300 degrees.

Sprinkle olive oil over both sides of tortillas and place on a cookie sheet. Heat in oven for about 5 minutes for each side. Add cheese and cook until cheese is melty. You can leave this in the oven to stay warm while everything else comes together. If you do this, add the cheese at the very end.

In a small saucepan, heat a small amount of olive oil, enough to coat bottom of pan, over medium heat. Add onion, sprinkle a bit more oil and reduce heat. The key to grilled onions is patience. To get nice, not crispy, onions, you need to give them time to cook. Don’t bother them. Just let them do their thing. It takes about 20 minutes for this.

Steam broccoli and whole potatoes. I have a really nice glass steamer I can stick in the microwave. Easy easy.

Meanwhile, chop sausages and mince garlic. When veggies are done, remove potatoes and chop. Heat olive oil in another small saucepan and add potatoes. Cook until outsides are crispy, about 10 minutes. Add garlic and sausages and cook until garlic is soft and sausages are warm.


Remove tortillas from oven. Add potato, sausage garlic mixture to the top and cover with broccoli. Garnish with grilled onions on top.


Because I use so much olive oil in my cooking, I got this handy little container at IKEA. It’s perfect for adding just the right amount of oil to the pan. It came with a twin (now holding my balsamic vinegar). It makes throwing together a vinaigrette a snap. I love this thing!

Tuesday, March 17, 2009

Irish Cupcakes

It’s St. Patrick’s Day and here is my Guinness recipe, as promised. First, though, a disclaimer. I’m not even the teeniest bit Irish. Not even close. None. Nothing. However, I love Guinness. A lot. Here’s some proof:


(that’s me at St. James’s Gate in Dublin)

Anyway, I saw this recipe back in January and thought “daaang! Perfect Paddy’s day recipe!” So here we are, today, and I have found an excuse to cook with both Guinness and Bailey’s. These are so delicious, though, that no one should need an excuse. The original recipe has these cupcakes filled, but though I do love a filled cupcake, I just didn’t feel like doing the extra work. Plus, not everyone likes a filled cupcake. These are amazing this way and I will have to restrain myself from eating all of them.

Irish Cupcakes modified from Chocolate Beer Cupcakes from dinneranddessert.wordpress.com:

Makes 24 cupcakes

For the cupcakes-
1 c. stout Guinness
1 c. (2 sticks) unsalted butter
¾ c. unsweetened cocoa powder (preferably Dutch-process)
2 c. all purpose flour
2 c. sugar
1 ½ tsp. baking soda
¾ tsp. salt
2 large eggs
2/3 c. sour cream

For the frosting-
3 to 4 c. confectioners sugar (3 cups was fine for me)
½ c. unsalted butter, at room temperature
4 Tb. Bailey’s


Preheat oven to 350°F. Line 24 cupcake cups with liners. Bring 1 cup stout and 1 cup butter to simmer in heavy large saucepan over medium heat. Add cocoa powder and whisk until mixture is smooth. Cool slightly.


Whisk flour, sugar, baking soda, and 3/4 teaspoon salt in large bowl to blend. Using an electric mixer, beat eggs and sour cream in another large bowl to blend. Add stout-chocolate mixture to egg mixture and beat just to combine. Add flour mixture and beat briefly on slow speed. Using rubber spatula, fold batter until completely combined.


Divide batter among cupcake liners, filling them 2/3 to 3/4 of the way. Bake cake until tester inserted into center comes out clean, rotating them once front to back if your oven bakes unevenly, about 17 minutes. Mine took closer to 18/19 minutes. Cool cupcakes on a rack completely.

For the frosting, whip the butter in the bowl of an electric mixer, or with a hand mixer, for several minutes. You want to get it very light and fluffy. Slowly add the powdered sugar, a few tablespoons at a time.


When the frosting looks thick enough to spread, drizzle in the Bailey’s and whip it until combined. If this has made the frosting too thin (it shouldn’t, but just in case) beat in another spoonful or two of powdered sugar. 4 tablespoons of Bailey’s made this frosting perfect.


Ice and decorate the cupcakes. I don’t have a pastry bag, so I filled a zip baggie with the frosting and cut the corner. This worked well for most of them, but then the top of the bag wouldn’t close and started to make a mess, so I frosted the last 4 the way I usually do. It doesn’t really matter though because these are so good, you’ll just eat them all up anyway.

I plan on sharing these with some friends, especially those more Irish than I am, but it will be difficult to not eat them all tonight!

Monday, March 16, 2009

Roasted Corn and Herbed Goat Cheese Quesadilla

One of my most favorite things in the world of food is goat cheese. I’ve mentioned it a few times in the last couple of weeks and I have something awesome planned for goat cheese in the near future.

Anyway, I’m not really sure what inspired this recipe other than being hungry and loving corn, goat cheese, and quesadillas. It’s really easy (and inexact, as my recipes tend to be) and very tasty.

This is what I did:

2 c.-ish of corn kernels (frozen-defrosted okay)
2 oz.-ish herbed goat cheese, room temperature (or regular or some other flavor. Whatever you like is awesome.)
2 small corn tortillas
Olive oil


In a medium saucepan, dry roast the corn over medium heat until browned spots appear on all sides, about 5 minutes. Set aside.

Spread warm goat cheese over one side of the corn tortilla. Sprinkle on corn, reserving a few for garnish and cover with other tortilla. I would’ve had more corn for mine, but I kept eating it because it’s just that good. Corn is awesome.

Heat a bit of olive oil in the same saucepan over medium-low heat. Gently place quesadilla in warmed oil and cook until browned on both sides, about 5-8 minutes each. Goat cheese takes a bit longer to warm up than other cheeses, so the medium-low heat is to make sure the tortilla doesn’t burn while the cheese is warming up.


Slide gently off pan and onto plate. Garnish with remaining corn and a few sprinkles of goat cheese. Serve immediately. This is a great appetizer or, if you’re like me and don’t want to share any of that delicious goat cheese, light meal, especially with some salad greens. Yum!
Related Posts Plugin for WordPress, Blogger...