Wednesday, February 22, 2012

Roasted Garlic Jelly

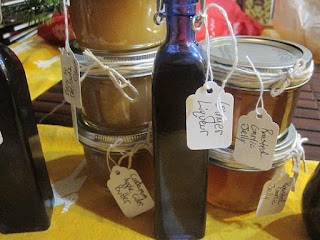
Of the three homemade gifts I made for this past holiday season (previously seen here and here), this one was by far the most complicated, but is by no means difficult. Like most canning projects it is necessary to get all of your equipment and ingredients in order and ready to go when you start in order to facilitate the process and, in general, not frustrate the heck outta yourself or get hot jelly on your fingers. That last part might happen anyway. I really enjoyed the end result (there was a little extra) and I also really liked reading through the Ball Home Preserving book. Though I’ve only made one of the recipes from it, I’m intrigued by many of the others, especially the pickles. Give this jelly a try. Like most savory jellies, it is really good poured over cream cheese and served with crackers, but it is also good as an addition to sandwiches and as a glaze for grilled meats.

Roasted Garlic Jelly from The Ball Complete Book of Home Preserving:

Makes 4 half-pint jars

3 medium heads garlic
1 Tb. olive oil, divided
1 Tb. balsamic vinegar, divided
1 c. dry white wine
2/3 c. water
½ c. white balsamic vinegar
1 tsp. whole black peppercorns, crushed
3 Tb. lemon juice
3 c. granulated sugar
2 3 oz. pouches liquid pectin

Preheat oven to 425 degrees. Using a sharp knife, cut off the tops of garlic heads, exposing cloves. Place each head on a small square of aluminum foil set on a baking sheet. Top each head with 1 tsp. olive oil and 1 tsp. balsamic vinegar. Scrunch foil loosely around garlic heads. Make sure to cover the tops or the vinegar will burn off quickly and it’ll make the peeling part later more of a pain, as I learned. Roast in oven until garlic is golden and very soft, 45 to 60 minutes. Let stand until cool enough to handle. Separate cloves, pinching each one to extract the soft roasted garlic. Discard skins. It might get messy here. It’s worth it.

In a medium stainless steel saucepan, combine roasted garlic, wine, water, white balsamic vinegar, and peppercorns. Bring to a boil over medium heat. Reduce heat and boil gently for 5 minutes. Cover, remove from heat and let steep for 15 minutes.

Transfer garlic mixture to a dampened jelly bag or strainer lined with several layers of cheesecloth set over a deep bowl. I went the cheesecloth route. Let drip, undisturbed, for about 30 minutes. Measure 1 2/3 cups garlic juice. If you do not have the required amount (like me) add up to ¼ cup dry white wine or water. Meanwhile, prepare canner, jars, and lids (see here and here and get a canning book!)

Transfer garlic juice to a large, deep stainless steel saucepan. Stir in lemon juice and sugar. Over high heat, stirring constantly, bring to a full rolling boil that cannot be stirred down. Stir in pectin. Boil hard, stirring constantly, for 1 minute. Remove from heat and quickly skim off foam.

Quickly pour hot jelly into hot jars, leaving ¼” headspace. Wipe rim. Center lid on jar. Screw band down until resistance is met, then increase to fingertip tight.

Place jars in canner, ensuring that they are completely covered with water. Bring to a boil and process for 10 minutes. Wait 5 minutes, then remove jars, cool, and store.

For my very first attempt at jelly, I was really pleased. It came out exactly the way I wanted it to and it tasted great. It was well worth the time at the end when it felt like everything was going to fall apart with the boiling and stirring and skimming, but it all worked out. I would definitely make this again. 
And thus, finally, concludes the homemade gift giving I did this year. Hopefully in the future I’ll be faster about posting things like this. Hopefully. At the very least I’m glad I was able to share (digitally) some tasty gifts.

Wednesday, February 15, 2012

Cardamom Apple Cider Butter


As I mentioned before, I unfortunately did not get any pictures of the making process or end result, other than the jar, of this delicious gift. For a great shot of it, you should check out Ashley English’s Canning & Preserving book. My dear friend and fellow blogger Renai is a big fan of hers. She also got some of this apple butter for Chrisannukah/her birthday. I think it was appropriate.

If you’ve made applesauce before, this recipe will seem very familiar. It is absolutely delicious and mine made more than the yield, which was great for me since I got to eat a lot of it and share it with my family before gifting it to them (it’s nice to have a test audience even if they are your intended audience). I highly recommended grinding your own cardamom as the flavor is so good and such a welcome punch to the already delicious apples. I don’t have a spice or coffee grinder, but find that my mortar and pestle works very well. Make this while apples are still in season.

Cardamom Apple Cider Butter from Canning & Preserving with Ashley English:

Yields 6 half pints

5 lb. cooking apples, peeled, cored, and coarsely chopped
1½ c. apple cider
2½ granulated sugar
1 Tb. ground cardamom or the seeds of 4 cardamom pods ground

Place the apples and cider in a large stainless steel post. Bring to a boil over medium-high heat. Reduce the heat and simmer for 25 minutes, stirring constantly to prevent sticking. If additional liquid is necessary, add water in 2 tablespoon increments. (I did not need this.) Remove from heat.

Once the cooked apple mixture is slightly cooled, puree it using a food processor or immersion blender or by pressing it through a food mill or fine meshed sieve. I did mine in batches in a food processor. Blend the apples until smooth but not runny.

Return puree to the pot, add the sugar and cardamom, and bring the mixture to a gentle boil over medium heat. Reduce the heat to low and simmer for 25 to 30 minutes until the apple butter thickens and clings to a spoon. Stir often to prevent the mixture from sticking. Remove from heat.

While the apple butter cooks, sterilize 6 half pint mason jars, lids, and screw rings. English’s canning instructions are easy to follow, but I’m not going to type everything up as they are very detailed. If you’re going to can, you should get a canning book. I have some directions here (from a previous jam recipe) to get you started and what is listed in the recipe are included here. Fill a canner or large stockpot with water and set over medium-high heat. Bring just to the boiling point. Place the lids in a small saucepan, fill with water, bring to a boil, turn off the heat, and set the pan aside.

Place the hot jars on top of a kitchen cloth on the counter. With the help of a canning funnel, pack he apple butter into the jars, reserving ¼” (6 mm) headspace. Use a nonmetallic spatula to remove any trapped air bubbles and wipe the rims clean with a damp cloth. Place on the lids and screw bands, tightening only until fingertip-tight.

Using a jar lifter, place the jars in the canner. Process for 10 minutes in boiling water.

Let them stand for 5 minutes off heat and uncovered before moving them to a kitchen cloth to cool and finish processing. You know they’re sealed when the lid curves down. Decorate (or at least date) the jars and give away and eat a bunch. Or both.

This is really good on pancakes/waffles, toast, chicken, by the spoonful. It makes for a lovely gift too, if you can stand to share it.

Tuesday, February 14, 2012

Valentine's Day

Argh, okay, I'm a liar. I had fully intended to post those other two homemade gift recipes a couple of weeks ago and then didn't. I'm sorry for being a bad blogger.

By way of apology, here is an adorable video of otters eating fish frozen into heart shaped ice.


Happy Valentine's Day!
Related Posts Plugin for WordPress, Blogger...